This page is related to helping you to make your own mobile. It's super preliminary and almost certainly contains mistakes and omissions. So, let me know what you think on how to improve it and give it a little time. But, it's out there...for now.
I was talking with someone who creates artwork that is only meant for the screen. He thought doing mobiles like this was too hard because you not only had to write the programs to create the patterns but then had to deal with actually putting into physical form. That means dealing with materials, machining, balance, and a whole lot more. I'm going to try to show you a different approach to mobiles than many people take. So, this page is kind of technical and is only meant to help you make your own mobile.
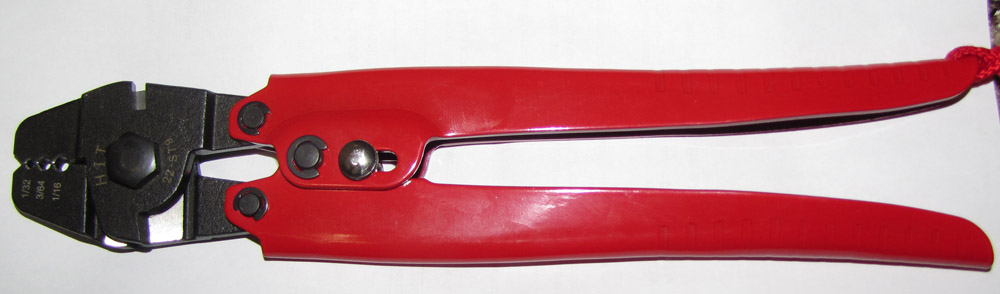
Most mobiles use steel rods bent into loops to support and
balance. The advantage to this is simplicity. Nothing fancy
required outside of a pliers and some steel rods. The downside to
this is that the mobiles don't actually rotate freely since two wire
loops don't have the ability to rotate freely around in 360
degrees. There are good and bad to this. You can't make the
mobile as dense as everything has to be able to freely rotate without
colliding with other pieces but there is something pleasing about
knowing the mobile is free to move in all directions unlike some other
designs. Choose which one works best for you or better yet, try
both.
Machinery Required
These parts were made with a metal lathe and bridgeport mill. The mill isn't a requirement but makes things easier when making multiple pieces. But the lathe is neccessary for making balancing sleeves as well as drilling and threading the rods. I have access to this equipment at a maker society.
Steel Rod
The rods used are typically 303 stainless steel with a diameter of
3/16". Aluminum is lighter but not as strong and will oxidize
over time unless you paint it or anodize it. This is another step
that can add a lot of expense and in the case of paint, can be chipped
off during assembly. Using stainless steel means you don't have
to worry about corrosion over the long term and it will look great for
decades to come. For the large, acrylic mobile there was
considerable deflection of even a 1/4" rod, so it was replaced by a
3/8" rod Every other rod was 3/16". The actual rod size
needed really depends on how heavy the mobile is.
These rods need to be drilled and thread for a screw that will hold the mobile pieces below it. The ideal size is a 4-40 screw, which is the largest you should use with the 3/16" rod. You may need to use a thicker screw if it's going to be supporting a lot of weight. Using a metal lathe, drill the rod using a #43 drill and go about 3/4" deep. Then using a 4-40 tap (and don't be cheap on the tap since you're working with a hard steel), tap the hole. Do this for the end of every rod.
Balancing Sleeves
The next thing to machine is a piece that is used to support and
balance the rod. These can be made of aluminum, which is easier
to machine, but again, can oxidize over time. The oxidation won't
affect it structurally but will change in appearance. This
piece can be made from 1/2" piece of 303 stainless steel rod. A
groove
can be made using a parting tool and should be turned down so that the
groove is .375" in diameter.
Using the parting tool, cut it off at .50" long and then face each end
on the lathe. Then drill a hole, slightly larger than the rod all
the way through the axis of the piece. There are occasions when
you'll need to use a slightly larger balancing sleeve such as at the
top of the mobile with a 3/8" rod, so you would need to start with
larger stock, say 5/8" to make a balancing sleeve.
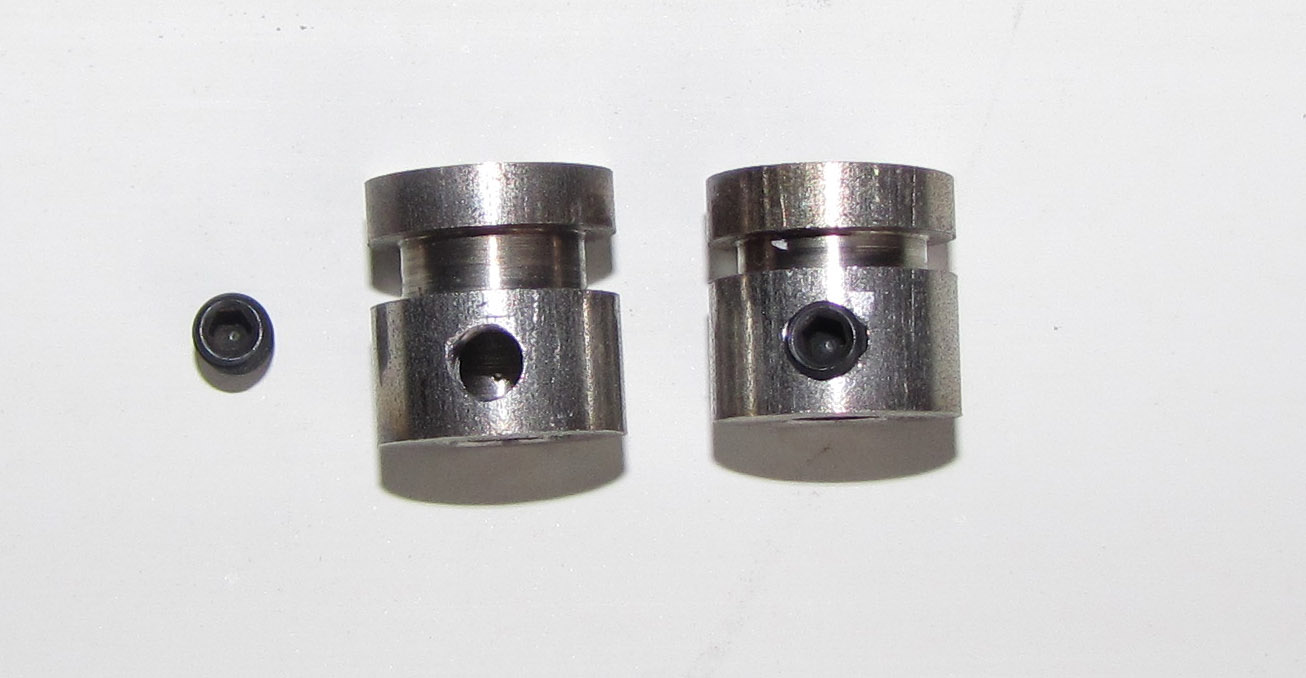
The final step is to put a hole using a #29 drill and put a hole that will allow you to place a set screw. This is best done on a milling machine. The #29 will be the correct size for a 8-32 set screw. The last step is to tap the hole using an 8-32 tap. You eitherr need to use a center drill before drilling but this requires additional steps so instead, to keep the drill tip from wandering while starting the hole on a rounded surface, use a 135 degree split point drill. Go slowly while the hole gets started.
The sleeves are pictured below with a 8-32 set screw. Notice the one sleeve that has the narrower slot, this is the standard sleeve that only has a single cable that will wrap around it. The larger groove is used when you need two cables to fit. One that holds the sleeve from the top and when you want to either hand another rod or decorative object below this sleeve, so you need to be able to fit two cables.
Stainless Steel Cable
These mobiles use a 1/32" 304 stainless steel cable. This can hold about 40 lbs. which is certainly is plenty for the mobiles used so far. If you use 1/16" cable, it can hold 96 lbs. and 3/32" cable can hold 184 lbs. If you get this heavy, you better do some extra work as 184 lbs. crashing down can do some real damage :-). See swaging below for information on fixing the cables and how much can be held.
Fishing Line
An 80 lb. test braided fishing line is used to affix the decorative
objects to the rod. Use a heavy line that can handle slight
abrasion of the line over the years as the mobile moves in the
breezes. This line is much heavier than is needed but it never
hurts to have a safety factor built in.
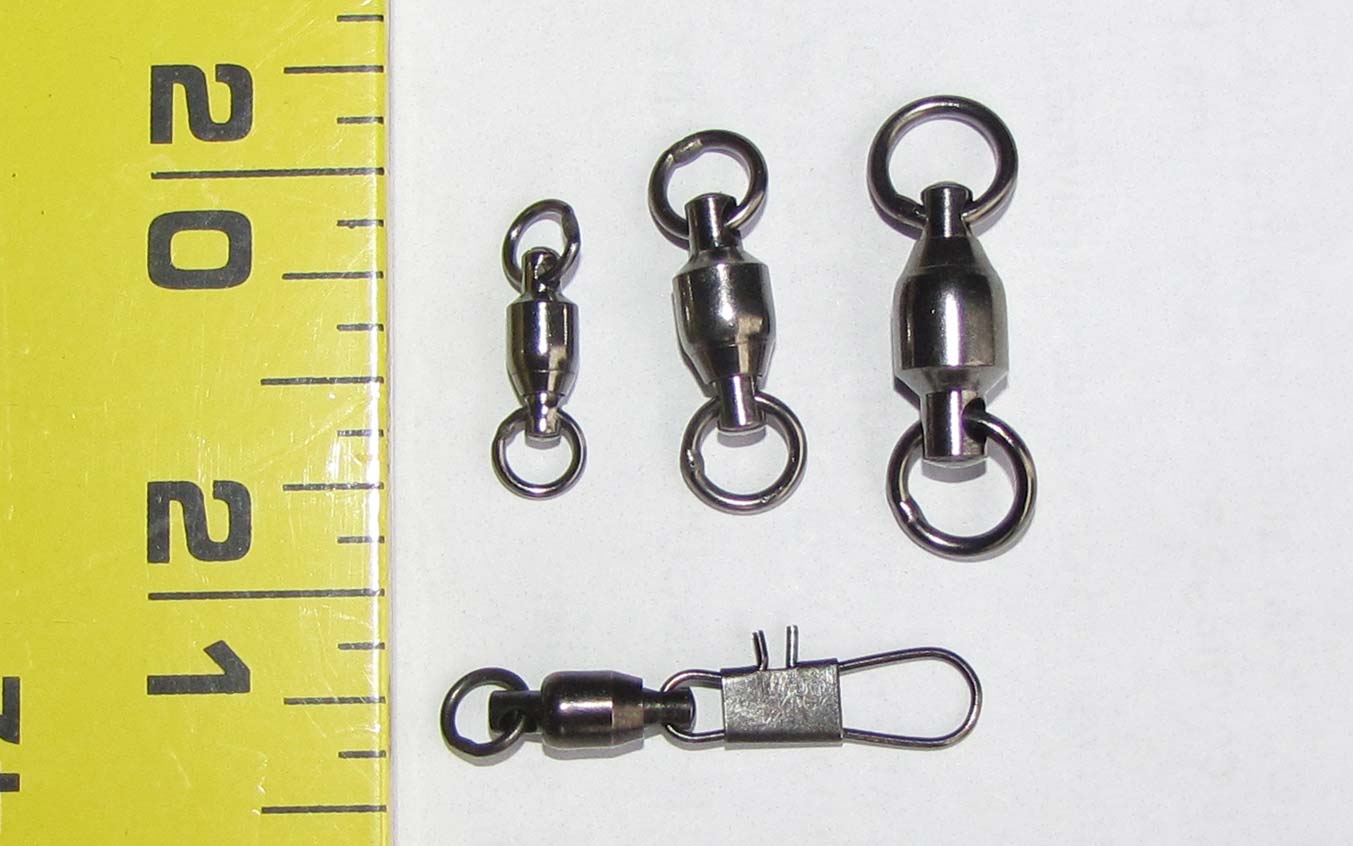
Ball Bearing Swivels
Use stainless steel ball bearing fishing swivels to attach the mobile pieces and steel rods. This will allow every piece to rotate freely. These should be available from any fishing tackle store. Pictures of the swivels are below. The swivel on the top left, is a #3 swivel. This is used to hold a single decorative object. The middle one is a #5 and is used when holding a steel rod from above, more weight hence bigger than a #3, and the right swivel is a #6 and this is only used at the top of the entire mobile. The swivel at the bottom is used when you need to hang an object from below a balancing sleeve (see balancing sleeve with wide groove above).
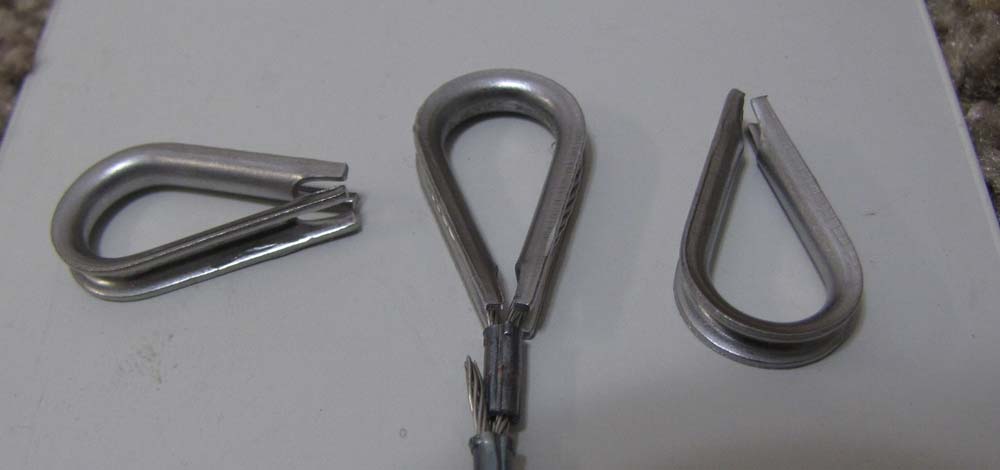
Stainless Steel Thimbles
A thimble is a loop that is used to wrap a cable around for making a smooth connection to another object. These are used at the top of the mobile to tie it to whatever you have in the ceiling or other support. Thimbles are pictured below and are sized based upon the thickness of cable used. These are sometimes called "wire rope thimbles", so keep that in mind when looking them up.
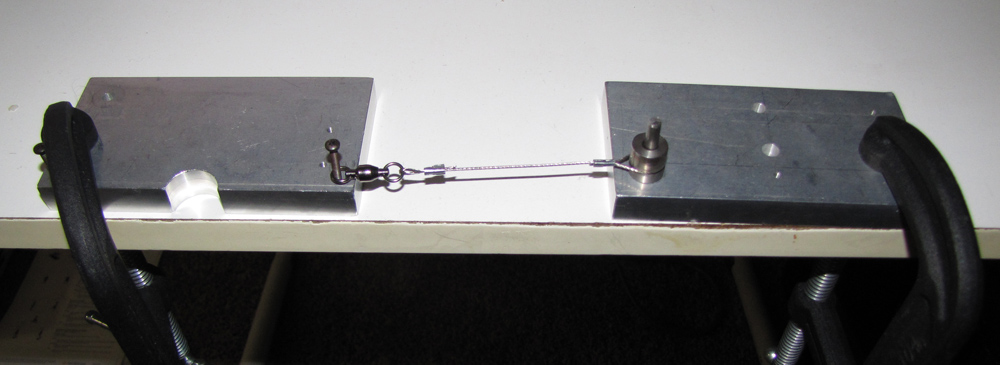
Tying Jigs
I spent a few hours making some tooling that would help in tying the various pieces together. It's not very complicated and consisted of some aluminum blocks with holes drilled at various locations on the blocks. The smaller holes were drilled and tapped for a 4-40 screw and the larger holes are made to fit the rods.
You determine what you want to tie and then place the two jigs at a given distance apart and them clamp them to a table top. The advantage to doing this is that you have the pieces fixed and they won't squirm around as you tie. For some mobiles, such as the Julia Mobile, this is critical to getting everything the same distance apart. For others, if you're 1/4" off, it's no big deal but just the fact that the pieces are fixed make it much easier to work.
The first pictures demonstrates how to attach a balancing sleeve to a swivel that will screw into a rod. You swage measure the distance, center to center, from the screw on the left piece to the center of the rod (which is stuck into a hole) on the right and then clamp the jigs to the table. Next you swage the cable to the swivel and then swage the cable around the balancing sleeve and you're done.
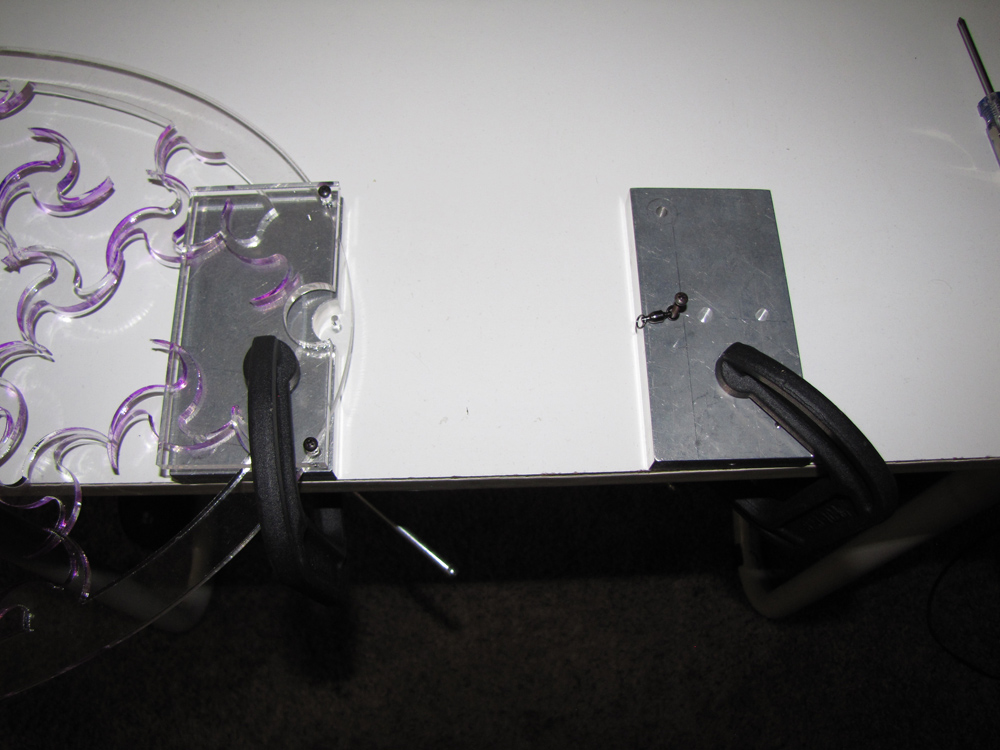
This shows how the left piece can be used to attach a mobile piece
to a swivel. Put the mobile piece under the acrylic piece of the
jig and then clamp that side down down to the table (always support the
left side of the piece to avoid any damage). Next, screw a swivel
into the other jig and set it to the measured distance and clamp it
down. Tie the fishing line between the swivel and the piece and
you're done. Note the half-round cutout on the jig and acryli to
make it easier to tie.
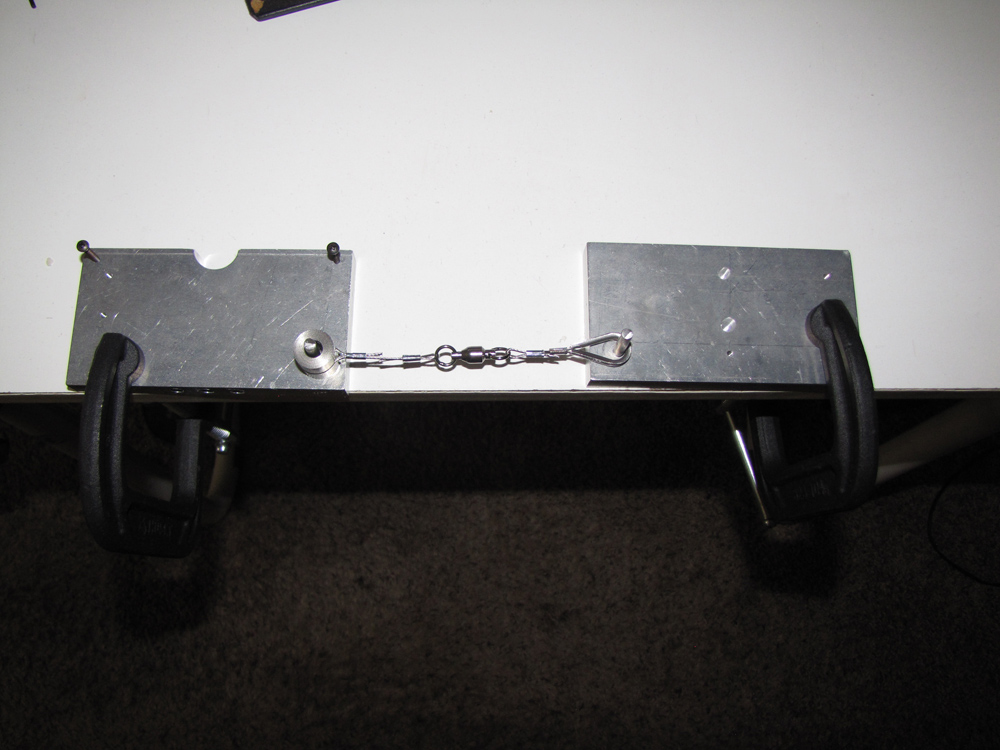
A final thing that can be tied is a cable thimble to a balancing sleeve.
Swaging
Swaging is a method of cleanly tying a cable. It consists of a metal sleeve that the cable goes through and a tool that compresses the sleeve to clamp onto the cable without unsightly cable clamps with bolts. The picture below shows a cable and sleeve that is ready to be compressed. Using these sleeves gives you a much cleaner look than other methods of fixing the cables, IMHO.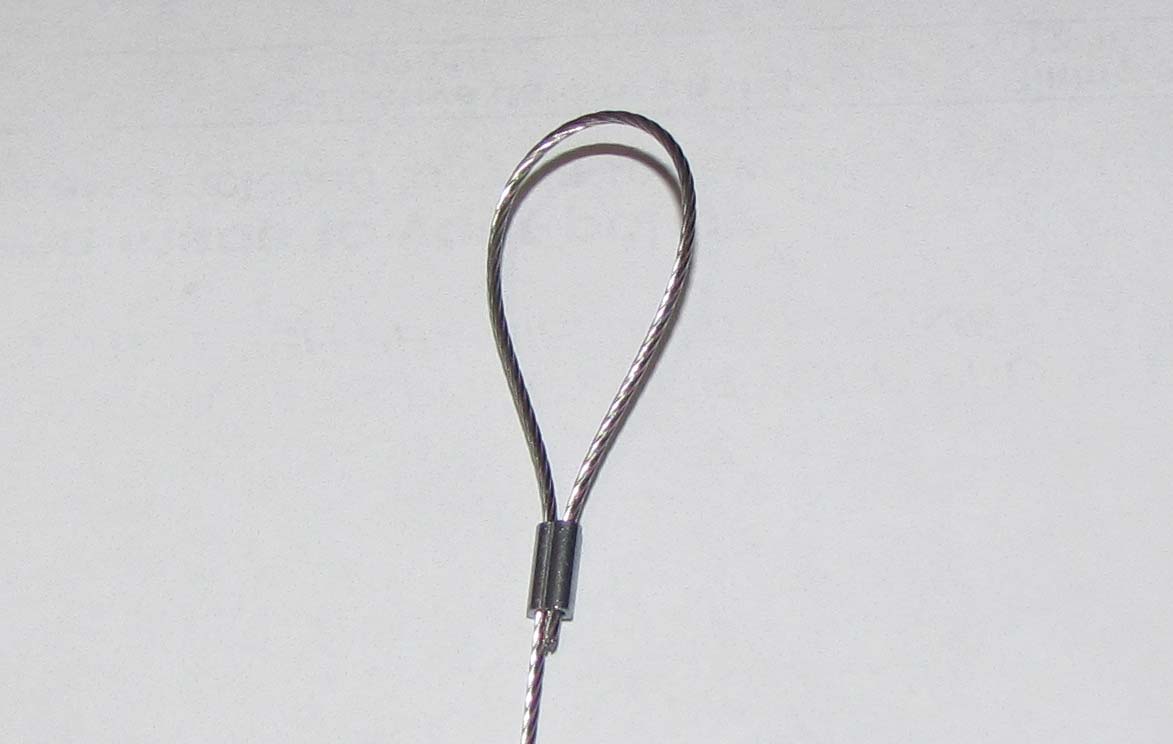
Below is a swaging tool that can handle three different sizes of cables. This tool should be sufficient for any reasonably sized mobile. Anything larger and you're talking about much different tooling and cable. It kinds of looks like a cable stripping tool but don't be tempted to use that. Right tool for the right job sort of thing.
The bare ends of cable will stick out from the swaging
sleeves and are sharp enough to draw blood. Put a tiny drop of
epoxy at the cable ends to
avoid these cuts (don't ask how I know). Make sure to use the
epoxy *before* you put the decorative pieces on it. Keep the glue
far, far away from the finished pieces while you work as no matter how
careful you are, glue will go places you don't want.
The general rule of thumb for a properly swaged connection is that
it's 90% of the strength of the underlying cable. It's probably
best to assume you didn't do it perfectly and only give it 50%, so
include a safety factor in everything you do.
Swaging vs. Swivels
There are some places where swaging is used and other places where fishing line is tied to swivels. Which method is used depends what it's attached to. When you go from the mobile piece to a swivel, fishing line is used as the swivels and object should have smooth edges. Swaging is used when attaching to a balancing sleeve as you don't want fishing line potentially rubbing up against a steel edge on the sleeve as the mobile moves. There might be a better way to do this but for now, it's the approach the I use.
The first step is to layout the design on paper and try to see if everything fits and can turn freely. You then layout a prototype of the approximate size the mobile will be or possibly make a scale model. Haven't yet made a scale model but one day, sure, give it a try.
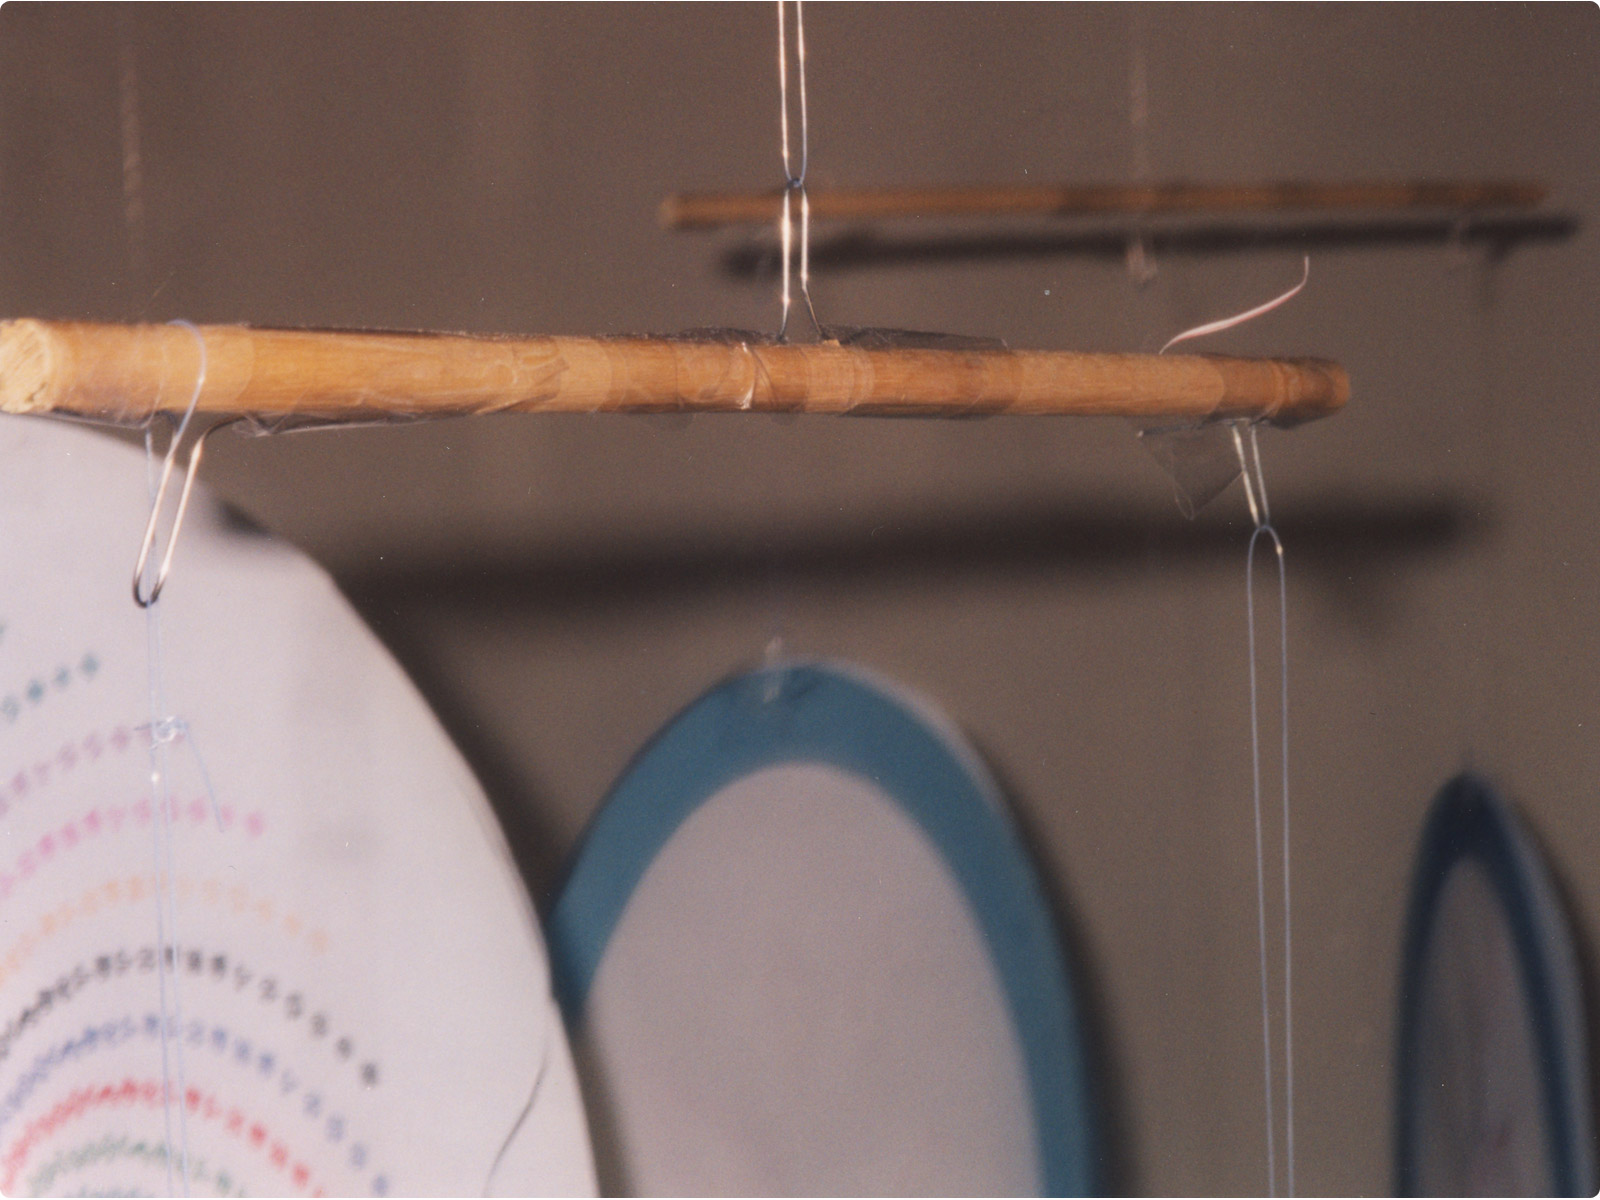
The first prototype was made of wooden rods, paper, polycarbonate, tape, string, and paper clips. It actually gave me a pretty good idea how it would look, fit together, and behave in terms of movement.
Another mobile was done using metal rods but used laser cut paper to fill in for the decorative pieces. Paper is cheap and easy to work with This also gave a pretty good idea how the mobile would look like.
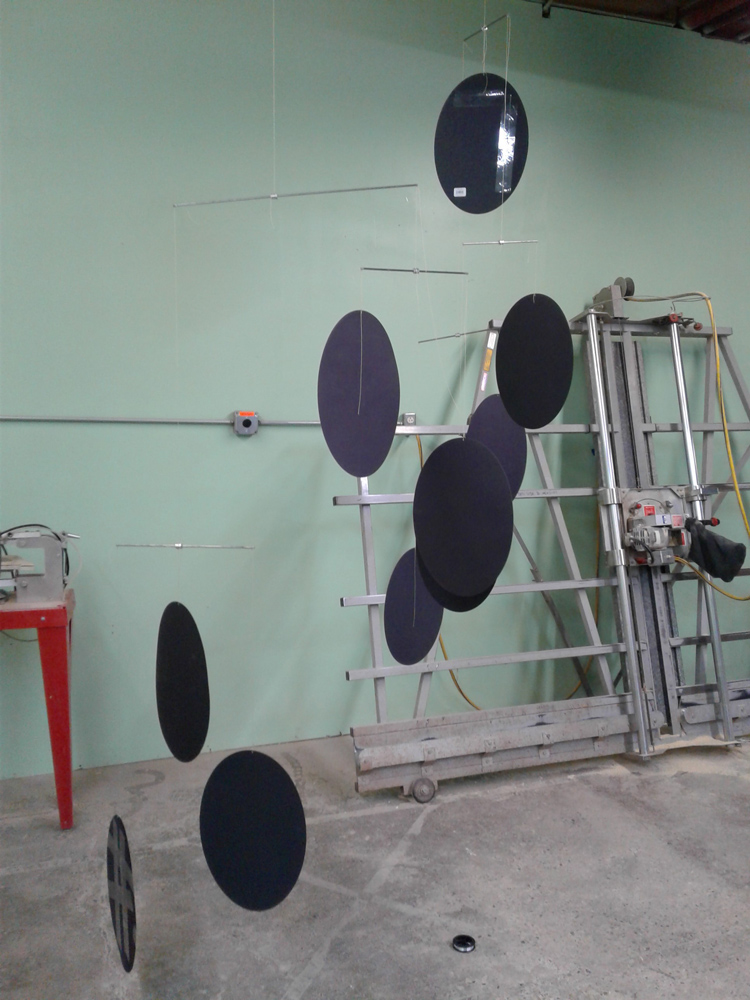
One thing to keep in mind is that if the mobile pieces weight different amounts, this will affect the layout some. In the case of the first prototype, the pieces used the same amount of material and would all weight the same. As such, things would be very close to the prototype itself. But in the mobile with the black paper, all the prototype ellipses weighed the same but the laser cut pieces of acrylic would all be different weights. This means you need to give yourself a little slop in the design and not make things fit too close together. If you have a heavy piece and light piece balancing on the same rod, you will have to move the heavier piece closer to the balancing sleeve, in some cases several inches closer. As such, things wouldn't be nearly as symmetrical as they were on the prototype and might fit together differently. Somtimes this can be a problem, sometimes not.
Assembling the Mobile
Ar this point, it's time to start putting the mobile together. The first step is to find a place where you can hang the mobile from the ceiling and tie a rope or whatever works for the time being. Next, get the metal parts together. All the rods and balancing sleeves should be assembled. I like to put a clean sheet on the floor to avoid scratching or marring the piecs of the mobile when the time comes. Next, screw the pieces of the mobile into the steel rods. At this point, you don't know how the mobile will be balanced but don't worry about it, get it together. Pull the mobile up so that it's completely off the ground. It won't even be close to balancing but that's the next step.
Balancing the mobile
Once you have the mobile assembled, the last step is to balance
it. Raise the mobile so that the lowest piece is just above the
floor using the wire thimble at the top. Start at the lowest
levels and get these to balance and
then work your way up. Since we used the balancing sleeves,
getting the mobile balanced is very easy. If the rod is pointing
downward in one direction, loosen the set screw on the balancing sleeve
and move it in the direction that the rod is angling downward until you
start to get that particular
rod to hang level and then tighten the set screw. Repeat this
until you're satisfied for that particular steel rod, it won't take
long. The sleeves
make your life much simpler. Then, move up one level on the
mobile and keep going until the entire mobile is balanced. Once the
mobile is assembled, it might only take you a few minutes to get it to
balance.
Those balancing sleeves are pretty spiffy. I'd like to take credit for them but it wasn't my idea. I worked with a mechanical engineer and couldn't come up with a solution for several weeks and I went to him and described the problem. He thought about for 10-15 seconds and then, "Let's go downstairs to the machine shop." He quickly machined a few prototypes and voila! Balancing sleeves. Thanks Bruce!
Thread Locking
If you're putting the mobile together for a long time, it's probably a good idea to use a thread locker, the most common of which is Loctite. I prefer not to risk having the set screws or 4-40 screws back off over time due to vibration. Would a mechanical engineer worry about this? Mmmm...not sure but it's an extra safety feature. Use a weak version of a threadlocker so that you can easily disassemble or repair the mobile if need be. Purple Loctite is best in that it's designed for use with smaller threads and can easily be unscrewed.
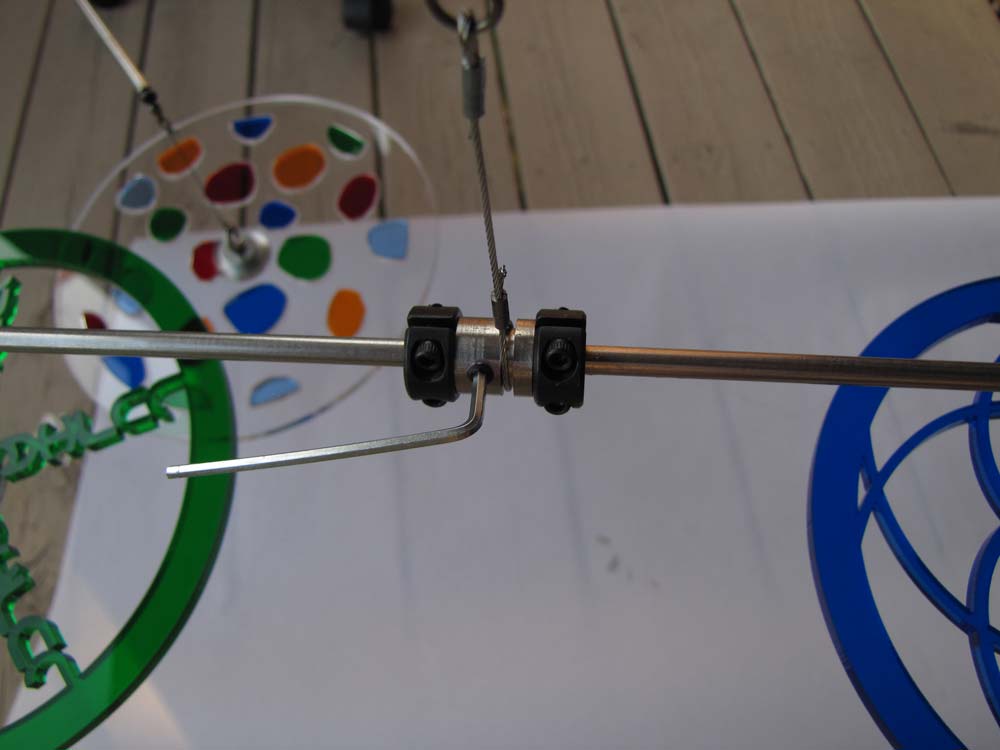
The Julia mobile was tricky to get to balance properly and there was a problem in that after balancing, the set screws would have to be removed before using thread locker and the balance would be slightly altered. The vertically hanging mobiles are much easier to balance for some reason. So, split shaft collars were used and are pictured below. The shaft collars can be used to fix the balancing sleeves in place while removing the set screw to put the thread locker on and then removed once the sleeve is in place. You can buy split shaft collars at a hardware store with a good loose parts section. Make sure to get the split collars, regular shaft collars won't work for this application.
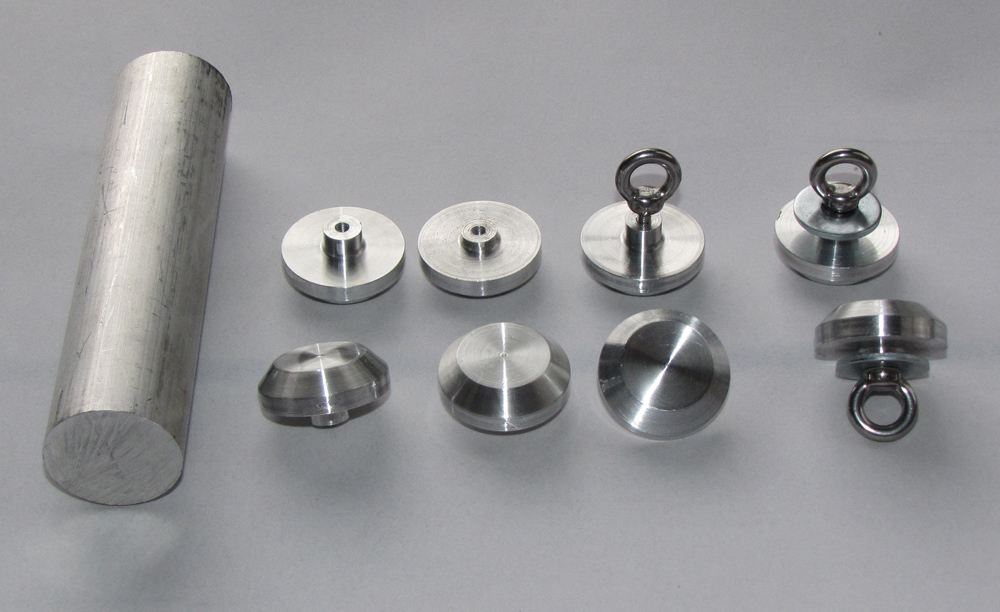
Additional parts for the Julia Mobile
This particular mobile has the acrylic pieces that are hanging
horizontally, parallel to the floor, so that it was visible for a baby
in a crib. It took the addition of some additional aluminum
pieces that would allow the pieces to hang like that. They are
more complicated than I can go into here, so if you're interested,
contact me and I can provide additional instructions. FWIW, the
eyehooks used here are standard M3 (3mm metric) eyehooks that are
available online. These pieces take some time to machine but once
done, make it easy to construct this type of mobile. These pieces
are constructed from 1" 6061 aluminum rod. On the top row, you'll
notice two of the pieces have shoulders of different heights, this is
to accomodate a different thickness of acrylic. The shorter one
is for 1/8" acrylic and the taller one is for 1/4".
To prevent oxidation of the bare aluminum, a coating from Everbrite Coatings was used. While anodization is ideal, unless you're going to do hundreds of parts, anodization isn't feasible and the Everbrite coatings are better for small lots.